Documentation
About Kubeapps
Tutorials
- Get Started with Kubeapps
- Using an OIDC provider
- Managing Carvel packages
- Managing Flux packages
- Kubeapps on TKG
- Kubeapps on TCE
How-to guides
- Using the dashboard
- Access Control
- Basic Form Support
- Custon App View Support
- Custom Form Component Support
- Multi-cluster Support
- Offline installation
- Private Package Repository
- Syncing Package Repositories
- Using an OIDC provider with Pinniped
Background
Reference
About the project
Step 2: Configure and Install Kubeapps 
Once the VMware Tanzu™ Kubernetes Grid™ cluster has been configured to work with Pinniped and the OIDC provider, the next step is to configure Kubeapps. This involves a number of tasks, including making Kubeapps proxy requests to Pinniped, enabling the OIDC login and, optionally, configuring the look and feel of the Kubeapps user interface.
Kubeapps is currently officially delivered as a Helm chart packaged by Bitnami. This Helm Chart offers a large number of configuration options in its
values.yaml
file. A general overview of the key configuration parameters for a TKG cluster is shown below:
## Values likely to be modified

### Authentication-related parameters
clusters: # List of clusters that Kubeapps can target
authProxy: # Oauth2proxy configuration for setting up OIDC login
pinnipedProxy: # Pinniped-proxy configuration

### Look-and-feel-related parameters
dashboard: # Dashboard configuration
  customStyle: # Custom css to inject
  customComponents: # Custom components to inject
  customLocale: # Custom strings to inject

apprepository: # Apprepository controller configuration
  initialRepos: # Initial repositories to fetch
TIP: Refer to the Bitnami Kubeapps Helm chart documentation for more information.
The two main configuration areas are authentication and user interface.
Key authentication parameters are:
clustersto define the list of clusters that Kubeapps can target and which of them will use Pinniped;pinnipedProxyto enable the Pinniped Proxy component;authProxy: to define the flags used by OAuth2 Proxy, the component for performing the actual OIDC login.
Key user interface parameters are:
dashboard.customStylefor injecting custom CSS;dashboard.customLocalefor customizing some supported strings;apprepository.initialReposfor defining the repositories included by default during the installation.
TIP: These values can be entered in two different ways:
- As values passed via command line:
helm install kubeapps --namespace kubeapps --set ingress.enabled=true bitnami/kubeapps
- As values stored in a custom
values.yamlfile read in during chart deployment:helm install kubeapps --namespace kubeapps -f custom-values.yaml bitnami/kubeapps
Step 2.1: Configure Authentication 
The first step is to configure the clusters, pinnipedProxy and authProxy parameters to reflect the work done in
Step 1
. These parameters are discussed below:
Declare that the target cluster is using Pinniped by setting the parameter
pinnipedConfig.enabled=true. If using multiple target clusters, please refer to the Deploying to Multiple Clusters guide. Here is an example:TIP: Since the target cluster is the same as the cluster on which Kubeapps is installed, there is no need to set a URL. Note that the
namefield is used only to configure a display name in the Kubeapps dashboard.clusters: - name: my-tkg-cluster pinnipedConfig: enabled: trueEnable the Pinniped Proxy component so that the requests performed by Kubeapps can be proxied through Pinniped, by setting the parameter
pinnipedProxy.enabled=true. Here is an example:pinnipedProxy: enabled: true defaultAuthenticatorName: kubeapps-jwt-authenticator # this name must match the authenticator name previously createdTIP: The
defaultAuthenticatorNamemust match the JWTAuthenticator resource name created in Step 1 .NOTE: Just if you are using the Pinniped version provided by TMC (instead of the one already provided by TKG), you also need to point to its namespace and API group suffix as follows. You can read more about it in the chart documentation .
pinnipedProxy:
  # other options
  defaultPinnipedNamespace: vmware-system-tmc
  defaultPinnipedAPISuffix: pinniped.tmc.cloud.vmware.com
Configure the OAuth2Proxy component by entering the information gathered from the OIDC provider in Step 1 . This component performs the authentication flow, generating the appropriate request to the login page and retrieving the token in the callback URL. Here is an example. Remember to replace the placeholders as follows:
- Replace
CLIENT-IDwith the application ID obtained from the JSON file in the previous step. - Replace
CLIENT-SECRETwith the application secret obtained from the JSON file in the previous step. - Replace
COOKIE-SECRETwith a seed string for secure cookies (should be a 16-, 24-, or 32-byte string). Have a look at the OAuth2Proxy documentation for additional information. - Replace the
OIDC-ISSUER-URLwith the issuer URL of the OIDC provider. For CSP it ishttps://gaz.csp-vidm-prod.com. - Replace the
OIDC-LOGIN-URLwith the login URL of the OIDC provider. For CSP it ishttps://console.cloud.vmware.com/csp/gateway/discovery. - Replace the
OIDC-REDEEM-URLwith the token redeem URL of the OIDC provider. For CSP it ishttps://console.cloud.vmware.com/csp/gateway/am/api/auth/token. - Replace the
OIDC-JWKS-URLwith the JSON Web Key Set URL of the OIDC provider. For CSP it ishttps://console.cloud.vmware.com/csp/gateway/am/api/auth/token-public-key?format=jwks.
- Replace
TIP: Remember that any OIDC-compliant provider should expose a
.well-known/openid-configuration( CSP example ) where you will able to find the required endpoints in this step.
authProxy:
  enabled: true
  provider: oidc
  clientID: CLIENT-ID
  clientSecret: CLIENT-SECRET
  cookieSecret: COOKIE-SECRET
  extraFlags:
    - --skip-oidc-discovery=true
    - --oidc-issuer-url=OIDC-ISSUER-URL # In CSP: https://gaz.csp-vidm-prod.com
    - --login-url=OIDC-LOGIN-URL # In CSP: https://console.cloud.vmware.com/csp/gateway/discovery
    - --redeem-url=OIDC-REDEEM-URL # In CSP: https://console.cloud.vmware.com/csp/gateway/am/api/auth/token
    - --oidc-jwks-url=OIDC-JWKS-URL # In CSP: https://console.cloud.vmware.com/csp/gateway/am/api/auth/token-public-key?format=jwks
TIP: In some providers whose issuer URL does match the token URL, the flag
--skip-oidc-discovery=truecan be removed. Instead, just setting the--oidc-issuer-urlflag will perform the automatic discovery of the rest of the endpoints. Further information at the official OAuth2Proxy documentation .
At this point, Kubeapps is configured to use Pinniped for authentication.
Step 2.2: Configure the User Interface (optional) 
The next step is to provide a rich user experience, aligned with corporate branding policies. This is achieved by configuring the dashboard and apprepository parameters. These parameters are discussed below:
Customize the interface strings and CSS rules with the
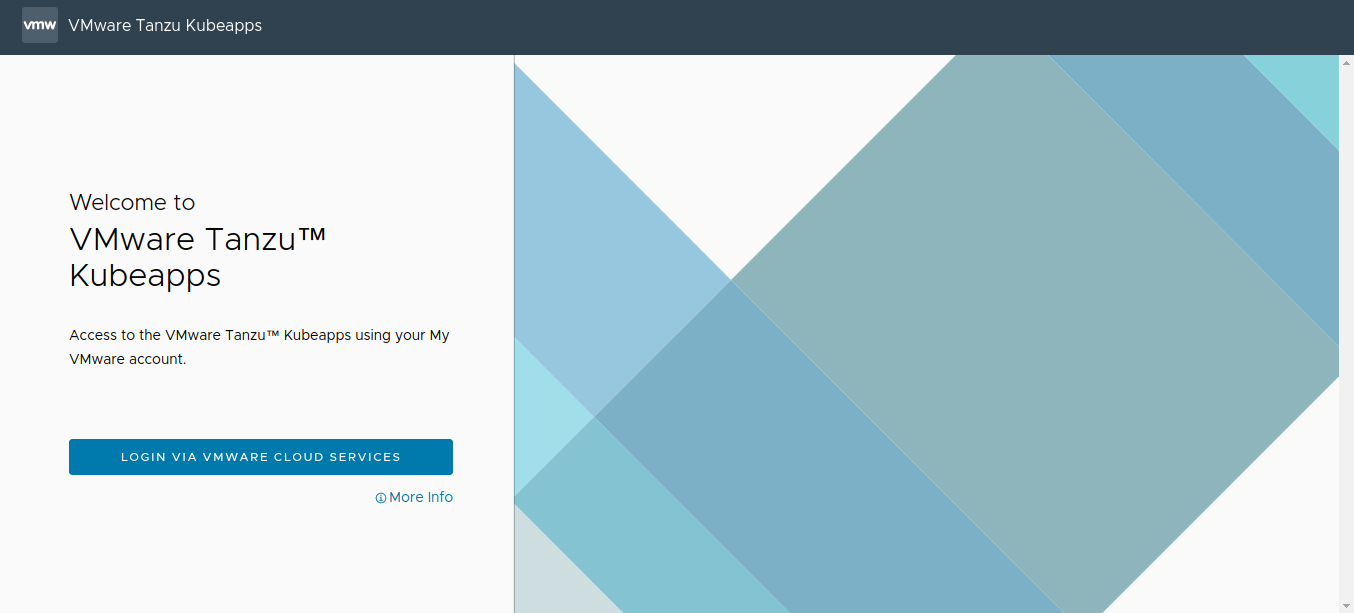
dashboard.customLocaleanddashboard.customStyleparameters. A simple example is to change the displayed application name (Kubeapps) and replace it with a different name, the corporate name/brand (VMware Tanzu™ Kubeapps). To do this, just set thedashboard.customLocaleparameters to the custom strings. Here is an example of replacingKubeappswithVMware Tanzu™ Kubeapps:dashboard: customLocale: Kubeapps: VMware Tanzu™ Kubeapps login-desc-oidc: Access to the VMware Tanzu™ Kubeapps using your My VMware account. login-oidc: Login via VMware Cloud ServicesTIP: See the complete list of customizable strings .
In a similar manner, add custom style rules using custom CSS selectors. For example, to change the Kubeapps logo, set the selector
.kubeapps-logoto the propertybackground-image: url('data:image/png;base64...')as shown in the example below. The long string shown is the Base64-encoded data for the new logo image.dashboard: customStyle: |- .kubeapps-logo { background-image: url('data:image/png;base64,iVBORw0KGgoAAAANSUhEUgAAAQQAAAA4CAYAAAAbx4ZoAAANHklEQVR4Xu2debT11RjHv9+wDBWiWZQsU5Q0a6JEVCoqc4MVKhkbaFAkxJJSISoZKskQQoZKiJQkkamMlaESFVKUx/qctfddv/f3nnvO79z3vuuee3r2P/ftd/ZvD9/neb7PsPc5WdkSgUQgESgIOJFIBBKBRKAikISQupAIJAJTCCQhpDIkAolAEkLqQCKQCCyMQEYIqRWJQCKQEULqQCKQCGSEkDqQCCQCAxDIlCHVIxFIBDJlSB1IBBKBDilDRCwhaTlJS0m61xyCdqukm2z/bw7XkFMnAvcoBBZKGSJi5UIG4wDErbZvGIeF5BoSgXsCAv0I4TFjtPG7bf9mjNaTS0kEJhqBcScE2b56oiWQm0sExgiBJIQxEkYuJRGYawSSEOZaAjl/IjBGCCQhjJEwcimJwFwjkIQw1xLI+ROBMUIgCWGMhJFLSQTmGoEkhLmWQM6fCIwRAkkIYySMXEoiMNcIJCHMtQRy/kRgjBCYGEKIiFdIereklW3f0Q/jiHiEpN9J2tL2tyPirZJeI2k12/+Y5p0XSPqUpMfb/uUYyW7gUiKCtT52QKfLba83H/YTESFpM9vfba43Ik6W9BxJG9i+tuteIuLXkt5sG7lmayAwSYSwpKQ/YeC2PzGNcR8paRfbj+PzQghvkXSQbchkgRYR4HOlpDXnISE8RRKY0B4u6VRJz5f09/LsNts/mA/W0I8QImJ/SW+XtIXtS0bZRxLC9GhNRwhLS/qApMskndB6fXdJT5eER+Uz/r5a0sMk/VHSOyVtKOm5khinPuPzQyRhrOeXMfHO65d3qvd9lyS+6XgUfUa5uhwRH5S0tu2N+xj3vSX9QdLRto9tEcJNJUq4veWBdpT0+fJsXkUIrX1AgL+QtJLtv4xiPOPQt00IEbGdpC9I2tX2maOuMQlhdELYQNJp5bUti1Hzn1sVomiOeJukBzYetP+bjzAqFBJCuL4QCmTxw/Ienx/UGr8X7o5ICGsVj76W7Z+2jAKC+iTEZftvDULYRtKjJR1p+5jWO6zvZknPrBFCRHxY0kNs71L7FgU9W9Lytm8pY0O2fFOTiOWsiGAMiBNs7yPp++UzUpheq4oq6QGS8IDn2D64fAbJ4RF5/1+SzpJ0sG3+PbBFxLSEEBEPlfRaSTtJeqSk6yRBrCfYJlRnXadIulsSofY+kpYtzmKfKp+I+JgknEW7XWp7o4g4WtIqtl/Ywvhrkr5lG0fQtzUJISKI1r4n6RjbpHxTrescDZwfLOkA0kxJV6CfpJKtMQfi3hG/l5KiFCeJM0KGdxZ9PLSmuBHRqV+RCbq0X1k73/fBgX/U9n+G6cOgzwelDN8sXv/9jSihPvt4iQJQNCIAjJmogEXSiADog4JAIpAE3pb3aTtgYJKqEvA5kQKEwTu8vy8dRyGEAhSG9iPbvfdriwgU70bbuzWeoVCbSiI33QuDaAgHovgS9QYUtkEIz5aEV1rW9l1lTgzmZZJ2s31GecZ+UFz63RYRr8K2JF1U/rI+SGKNKsSiqL+XdP9SD8GYbogIIrIvF6FDBCjyEZL+anv7YQowhBD47QvG+lypr6wh6UOSDrdNmlEJAcJg7jcWZUZ2PTnavjMiHlV+R6MuhzQFAt7P9gldjbXfXiohSLpGEmnOxbZf1O7bdY6CM46J39ogjUT/XllkSAqC3Nj3UNwjogt+GPp7Jf0Z8rX9nYIX0fIttrct83XtR90E+6JuxreB10X3JG1vm+h6xm0QIeBREXr16M3ogGIUXgSmq4TR9Pi7FsE138Hjf1ESJMI7/OXz2jAQCIHUAoLpheozIIQ9JB1Xios97xkReD682+ZV2OV5JQS8PYZIoamXIkXExSXFeEMRZC9liIj7YoiStrF9UflBGQT9GUkr1MghIg6XtIntradRcn6IhuhgX9sYe40QSME2bJAEMsIDfNr2oQ0yIyrDQHZmHYM0YBAhTLO2l0vauxYdS4QAcU2lYhFBlEP6AQl+pUW+7O1C0knbhPfsbVEjBHSFCOlJRba9SKw1b6c5CiH8l7GaHjUiTpe0qu3NSv1oRrhHRBs/DJ2I+1m2v96Q4YqSfkth1PYFJULo0o90es2K7Yytv8+LgwgBA0eo/K3hPEKp4T0LbxICw/+qzFEJoZl6QAh4f4ye9IEIgcZ4kE/zGYTTq/rPgBDwrhQXD7D9kaKM1DUAnXBzqpWi4qa2t4oI+rBuPN3mkr4hiRQE48fgp2oIEYHxX2P7kIggwoCtN5NEHWS54jGJVE6zDXFiEE+VRAETDwyLXy5pI0nH235fgxCOq6RUnj1REukPpyeso7l+quw320Y+07YhEQLpCevaWdL9CjHiBLa2TSQylTLYJopqzk+N6VTbJ7aeEx4TEWFw1GdmgxB+VuZ4kKRz22sZZY5CCKe005QiI3SeOVbtgntEdMEPQsAJLlPTsIpXRHxV0lW2DyyE0KUfTgYSRv7sA12alTbslIGiH2lA01hrTWEmhID3r2kDGyA1wCMTOdQ2lS7wYFRCKIpBhLCx7fWLJ+NI6h22Abup0L0IoRACeTFRArn7i0s4vlNEwOJtQkDAhMLrFM9n2/tHBAbCmJDBjaVQeX1EPLk8ew+eXhIeFEKEhE6qitmv2BURkPB5JUxvC52fuDvbNkejMyUE1gNJHVi81QqlnrCXbQiiEsJdtvdu4Ud1//QmrhEByZGHb2u7Fo9ngxCQAWOTipDC7VHTs4ZxjRIhHGG71sl6Q0TE6iUE5y+OYSjuEdEFP/TlbbYZd4EWEaQNYXv3QghD+5W1blHSt2eU6PdA26S4i9SGEUIzDagGXHPzmRACY9T3+HdNDWptovmst7EZEgIKjkcht0IIeHA87AL5VTNCKCBjsIR7eMZ1bF8xDSEsUwqG3GsgXN+z5IWHFYVlP0QovXP+iKDgQ+TAsV+TkDCY84cQAnu5qtRo+t2VICynjjMyIUTE8mUfT7D984ZhEfWwrpEIISJIYyjOfdb2m1p75Vh39WYxtmBDCH1hh6LiDrbPKe+gN0Qh6zXvhkREpzk6RAjsA9kOxF0SaQeF42H4QQgnlQiBYmJTB9CfSxoRwtB+rfcpCkPUOCLqHwvc1RiVHYYRAuPVQh//rqlA07DxchgcraYMFJsIn2vKgMISWdBqbQLlph+f1UiEZzDflOLPhBCK0gA0kQ31g2tt79kGpw8h4B3J6y+wTeEGY14oQijPMXpCNWoWK9q+OyLIb1FwPMvVtilYMQYnE3fYfl3D6KhFELkcO4gQyvuQ28k1tWiMsUSXH6GdLmWIiJVKesWpSb2fwHqpmxw1A0IgB+cn+KidYCxNxeckA+IEo16LCCIccugTOxDC1MWkkt8Taq9SLiX1josjotMchRAwTI6op9ZZvDWFZdI/xhuI+wj41RoC++8Vasv4pIM/LulZs4YwrN/S7Yt0peZ1hm2cz4xbF0JgcHJ/jKt5kYXwn7D30oYB1yLhVKhYCofkpM1bfpACRFDHIxJ5Xp85ZhQhFLBfUnIsvNxG/S7htAmhvEc+f6Zt9jWIEDBuIgqEwAlDFTJpB8dYeK+flDEorEGaFJUuiwjyU9IXLg9xL6J32jLd+XhE0A8DqOkVKQenHVTa1x129DikhsDRKsT2ekkcWZF+QPKQXOcIISLAm/CXdKv5O5i3E31EBPqCDuDZUVqiMHLgp3GiMgohFKyo7mNM59mGlMGv0xwFZ/SP/VKoxAHhMKjaN08ZhuIeEV3wgxDAlEIohHBBKapz8kD9gBMt1t+1H+//UxKOhrs1m+BYip4vcNw+KjN0JYRRx521/osQIeCBEfp1tsnhF2rTEMKSTQMbECGsVqKJHW1P1UAiAqPdzjaRyVSLCMI6zrxJN4hCiB6IjAamDA2iWZs6SCleclxGaIghDTxhKIo26B4C5HR8OX79dznePLecaoxCCBzr9jtRudI2a0fh8bwoLlEETgIihEA630NoYUrxl0iNekctIA+do3EPgXCbmhFRIDdSuYdAUbEpt4G4F3Ifhl+9X0C+j35wnMkJGFenuUsC7pUQIMxh/XA4RO4cOUOMnIYcVlOqRTG+iSWERQEl300EZhOBeuGoXpmfbuyu/WZzbe2xkhAWJ7o5diLQ8PxJCLOgDjNNGWZh6hwiEZgVBLp6/q79ZmVR0wySEcLiRDfHTgTmGQJJCPNMYLncRGBxIpCEsDjRzbETgXmGQBLCPBNYLjcRWJwIJCEsTnRz7ERgniGQhDDPBJbLTQQWJwLjTgj5v4NfnNLPsROBFgL9CIFrkUuNCVK38otBY7KWXEYiMPEI9CMEvjjD3W5+aIRvo81V46vKN3X5Nt9cLTDnTQQmDYGFCGHSNpj7SQQSge4IJCF0xyp7JgITj0ASwsSLODeYCHRHIAmhO1bZMxGYeASSECZexLnBRKA7AkkI3bHKnonAxCOQhDDxIs4NJgLdEUhC6I5V9kwEJh6BJISJF3FuMBHojkASQnessmciMPEI/B8l0gSinyDqvwAAAABJRU5ErkJggg==') !important; width: 21.6em !important; height: 4.2em !important; }This image depicts a customized version of Kubeapps applying the above styles and strings:

Customize the initial application repositories by setting the
apprepositoryparameter. Here is a simple example of adding the Bitnami open source catalog:apprepository: initialRepos: - name: bitnami url: https://charts.bitnami.com/bitnami
At this point, Kubeapps is configured to use a custom interface.
Step 2.3: Install Kubeapps 
With the configuration out of the way, it’s time to install Kubeapps. Since Kubeapps is currently officially delivered as a Helm chart packaged by Bitnami , the easiest way to install Kubeapps is to add the Bitnami repository to Helm and install it via Helm.
In case Kubeapps is to be installed in an air-gapped environment, please follow the offline installation instructions instead.
TIP: Typically, the Kubeapps dashboard is set as externally accessible, either by setting the parameter
frontend.service.type=LoadBalancer(as shown below) or by using an Ingress controller. Please refer to the Kubeapps documentation covering external access for additional information.frontend: service: type: LoadBalancer
Use the commands below to install Kubeapps. The final command assumes that the Kubeapps chart configuration parameters are defined in a file named custom-values.yaml, so ensure this file exists before running that command.
# Install the Bitnami helm repository
helm repo add bitnami https://charts.bitnami.com/bitnami

# Create a 'kubeapps' namespace in our cluster
kubectl create namespace kubeapps

# Install a 'kubeapps' release in the 'kubeapps' namespace with the values defined at 'custom-values.yaml'
helm install kubeapps --namespace kubeapps bitnami/kubeapps -f custom-values.yaml
Finally, remember to replace the placeholder Redirect URIs you entered when creating the OAuth2 application during step 1 with the actual value.
For instance, assuming Kubeapps is accessible at https://kubeapps.example.com replace https://localhost/oauth2/callback with https://kubeapps.example.com/oauth2/callback.
TIP: If you are serving Kubeapps from a subpath, for instance,
https://example.com/kubeapps, you will need to slightly modify theauthProxyconfiguration. Please follow these instructions for further details.

At this point, Kubeapps is installed in the cluster and the OIDC provider is fully configured.
Step 2.4: Configure Role-Based Access 
Once Kubeapps is installed, the next step is to configure access. Since Kubeapps delegates authorization to the existing Role-Based Access Control (RBAC) configured in the cluster, every permission should be granted using ClusterRoleBinding and RoleBinding objects. Please refer to the official documentation about
Kubeapps access control
for more information.
NOTE: RBAC configuration depends on your custom business requirements. The configuration shown below is only an example and not meant for production use. Please refer to the official Kubernetes RBAC documentation for more details.
The configuration shown below demonstrates how to create a ClusterRoleBinding named kubeapps-operator with the cluster-admin role for a specified user. Replace the EMAIL-ADDRESS placeholder with the email address for the user, as specified in the OIDC provider and name the file kubeapps-rbac.yaml.
---
kind: ClusterRoleBinding
apiVersion: rbac.authorization.k8s.io/v1
metadata:
  name: kubeapps-operator
roleRef:
  apiGroup: rbac.authorization.k8s.io
  kind: ClusterRole
  name: cluster-admin
subjects:
  - apiGroup: rbac.authorization.k8s.io
    kind: User
    name: EMAIL-ADDRESS
Apply this configuration by running the following command:
kubectl apply -f kubeapps-rbac.yaml
At this point, the user having EMAIL-ADDRESS email account will have cluster-admin access and will be able to perform any desired action via the kubectl CLI or the Kubeapps dashboard.
Step 2.5: Log in to Kubeapps with OIDC 
Once Kubeapps is installed and configured, the next step is to log in and access the Kubeapps Web dashboard. The procedure to do this depends on how Kubeapps was configured.
If the service was exposed externally , it may be accessed using a public IP address; if not, it can be accessed locally by forwarding the cluster port using the command below:
kubectl port-forward -n kubeapps svc/kubeapps 8080:80This will start an HTTP proxy for secure access to the Kubeapps dashboard.
Browse to http://127.0.0.1:8080 (when forwarding the port) or to the public IP address of the serevice (when exposing the service externally). You see the Kubeapps login page, as shown below:

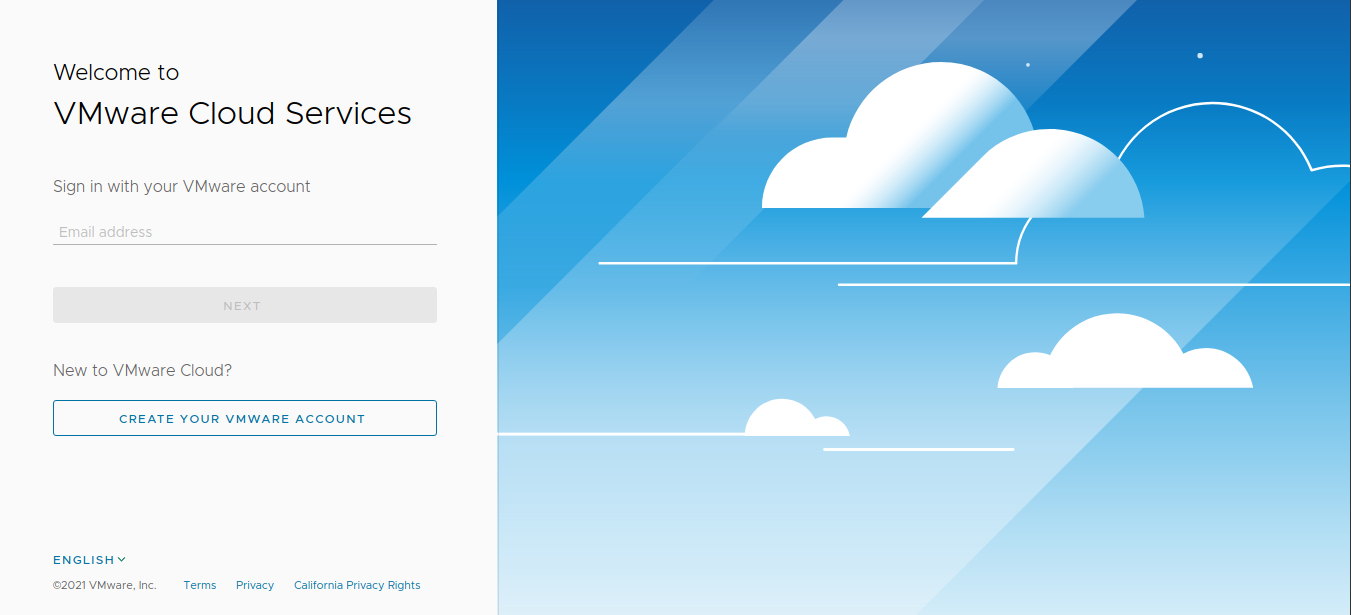
Click the Login button. You are redirected to the OIDC provider (in this example, the VMware Cloud Services Portal).

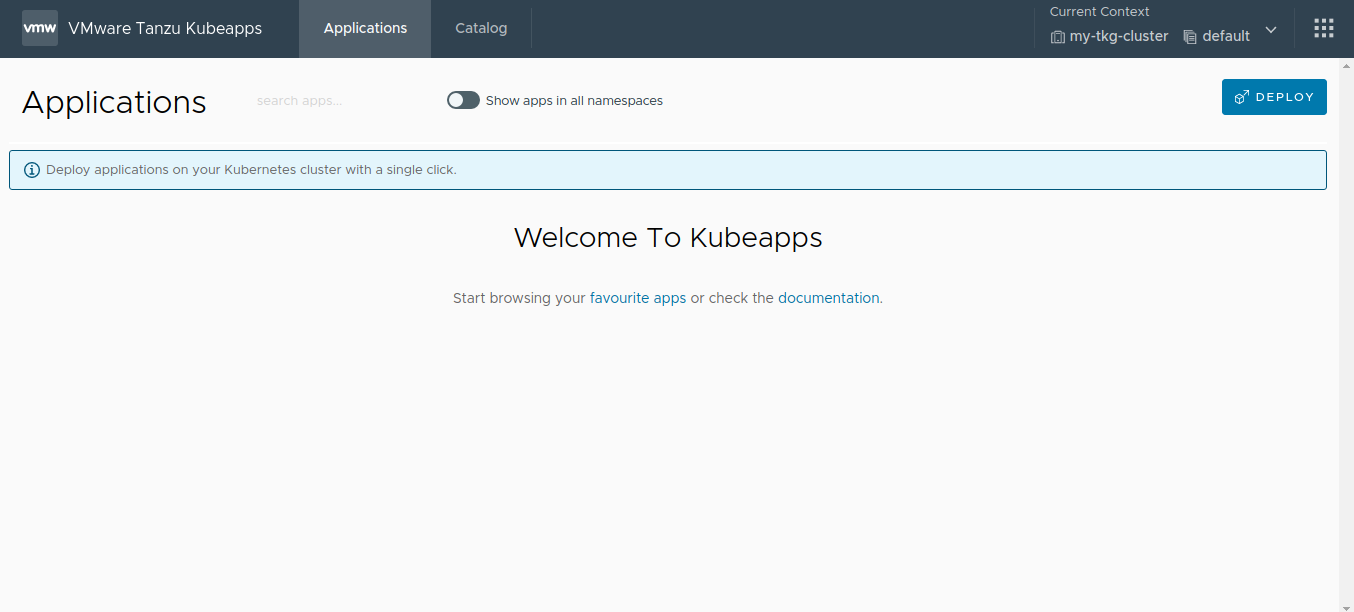
Enter the necessary credentials. If the login is successful, you are redirected to the Kubeapps dashboard:

At the end of this step, the Kubeapps installation is configured, customized and running in the cluster. The next step is to add application repositories to Kubeapps .

 Slack
Slack GitHub
 Twitter